Physbones
PhysBones is a set of components that lets you add secondary motion to avatars, permitting you to add motion to things like hair, tails, ears, clothing, and more! Using these well will make your avatar seem more dynamic and real.
PhysBones is a replacement for Dynamic Bones. While both systems share a lot of concepts, there are some major differences with PhysBones, so not all avatars may directly translate over to VRChat’s system.
An example of how to use Physbones can be found in the SDK under VRCSDK\Examples3\Dynamics\Robot Avatar.
VRCPhysBone
Defines a chain of bones to be animated with PhysBones. These can be used to simulate soft-body and secondary motion like hair, tails, floppy ears, and more! It has many configuration options, and can be set up in many ways.
Additionally, PhysBones can be interacted with by you and other people! If you've given the other user permission, other people can grab PhysBones set up on your avatar, and pull the Trigger while holding the PhysBone to "Pose" it and hold it in position. You can also disable this in configuration to not allow posing, not allow grabbing, or allow no collisions at all.
Although not designed as such, PhysBones also serves as a reasonable cloth substitute until such time that we implement our own Cloth component.
Versions
You can now select the version of VRCPhysBone component you would like to use directly on the component. By default the latest version will be chosen when creating a new component. Existing avatars will continue to use their previous version unless manually updated and re-uploaded.
Version 1.0:
- The base version of the VRCPhysBone component.
Version 1.1:
- Squishy Bones update, allowing for bones to squish and length to be affected by motion.
- Gravity now acts as a ratio of how far the bones will rotate when at rest. A positive Pull is required for bones to move in the direction of gravity.
- Stiffness now acts as a ratio which keeps a bone in it's previous orientation.
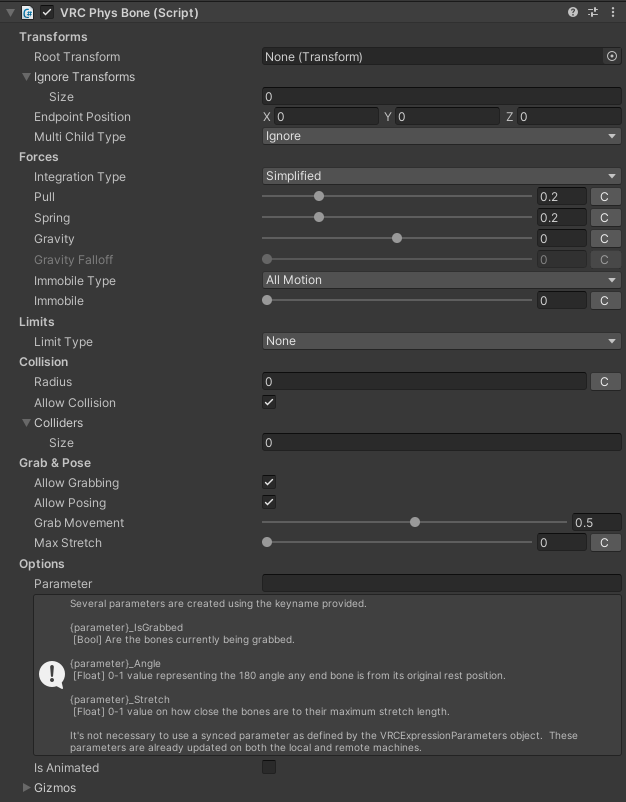
Transforms
Root Transform - The transform where this component begins. If left blank, we assume we start at this game object.
Ignore Transforms - List of ignored transforms that shouldn't be affected by this component. Ignored transforms automatically include any of that transform's children.
Endpoint Position - Vector used to create additional bones at each endpoint of the chain. Only used if the value is non-zero. Usually you'll want to increase this along +Y, which points "up" the bone.
Multi-Child Type - Behavior of the root bone when multiple bone chains exist. This has three modes:
If set to Ignore, the root bone will not move, and will ignore physics. Useful for things like hair, since you can use one Physbone component on the root to affect all of the hair bones!
If set to First, the root bone will form one continuous chain with the first bone chain in the hierarchy. Every other chain will still work, but they will start from the first bone in each respective chain rather than the root like the first chain.
If set to Average, the motion of the root bone will be the average of all of the other chains. This means that the base of each chain will be able to move.
If you are using a single root bone, or a single root bone with several children (but no grandchildren), you must define an endpoint position!
For example, if you put the PhysBone component on any of the RootBones below, you must define an Endpoint Position in order for PhysBones to work. This is different from Dynamic Bones!
Single Bone
RootBone
Multiple Children, Single Root
RootBoneChildBone1ChildBone2ChildBone3ChildBone4
You can also address this by adding "end bones" after each ChildBone, but that involves editing the armature.
Forces
Integration Type defines the type of math used to simulate the motion of any transform affected by this component. Depending on which you choose, your options available in the Forces section will change. You can choose between two:
Simplifiedis a more stable method that feels a bit slower and less reactive to external impulses and forces, but is easier to configure.Advancedis less stable, but allows more complicated configurations, and tends to be more reactive to external impulses and forces.
With default settings, both of these modes act fairly similarly, but adjusting the settings and testing them out will quickly reveal how they differ.
Most (if not all) of the options below allow for Curves by pressing the C button next to the slider. Curves let you adjust the value over the length of the bone chain, and allow for VERY complicated setups within bone chains!
In fact, most PhysBones settings allow for the use of Curves! Learn how to use them and your PhysBones will look amazing!

Pull - Amount of force used to return bones to their rest position.
Spring - Amount bones will wobble when trying to reach their rest position. Only available in Simplified Integration Type.
Momentum - The amount bones will wobble when trying to reach their rest position. Only available in Advanced Integration Type. Despite the description being the same, the effect is slightly different than Spring.
Stiffness - The amount bones will try to stay at their resting position. Only available in Advanced Integration Type.
Gravity - Amount of gravity applied to bones. Positive value pulls bones down, negative pulls upwards.
Gravity Falloff - Only available if Gravity is non-zero. It controls how much Gravity is removed while in the rest position. A value of 1.0 means that Gravity will not affect the bone while in rest position at all. This allows you to have the effects of gravity when the bone is rotated off the initial position without affecting the bone's rest state.
One way to use the Gravity Falloff parameter is that if your hair is modeled as already being in the pose you want when standing up normally, you can use 1.0 gravity falloff. That way gravity won't affect you when you're just standing there, and your hair will rest in its modeled position. If your hair is modeled 45 degrees straight out and you want it to be affected by gravity enough to have a nice curve (but not completely straight out or completely straight down), the slider allows you to fiddle with it and use like 0.5-0.8 to only have a fraction of gravity at rest pose.
Immobile Type changes how Immobile works.
If set to All Motion, Immobile reduces any motion as calculated from the root transform's parent. This is the default mode for new PhysBones and converted Dynamic Bones. In this mode all PhysBone movement in either scene-space or playspace will be dampened by the Immobile factor.
If set to World (Experimental), Immobile negates only positional movement from the reference of the scene root transform. Motion via animation or IK still affects the bones normally. This mode may change in the future!
This means that moving around in your playspace will still affect your PhysBones' movement as normal, but locomoting (pushing on your joystick to move) will have its movement dampened by the Immobile factor.
Limits
Setting Limits allows you to limit the amount that a PhysBone chain can move. This is useful when you don't want hair to clip into your head, and is far more performant than a collider!
Additionally, when configuring options for Limits, a visualization of those limits will appear in the Scene view when you have the PhysBone chain selected. These can be extremely helpful when fine-tuning Limits!
Limit Type has several modes. All of them allow for the adjustment of Rotation in terms of Pitch, Yaw, and Roll-- alternately, along the X, Y, and Z axes respectively.
None
None means no limit is enabled on this bone chain. There are no configuration options.
Angle
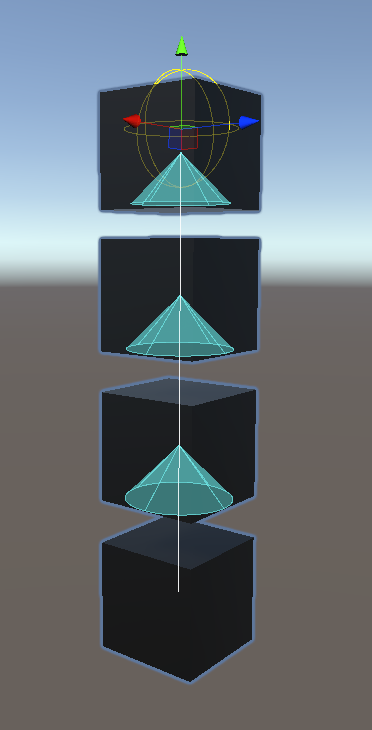
Angle means the bone chain will be limited to some Max Angle, centered on an axis as defined by Rotation. This is visualized as a Cone in the Scene view.
Hinge
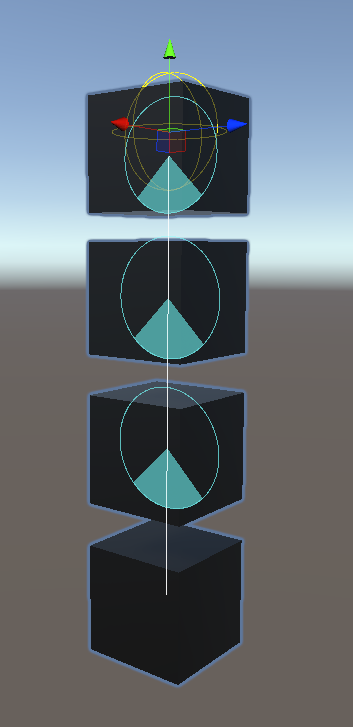
Hinge means that the bone chain will be limited to some Max Angle along the plane defined by the Rotation. This is visualized as a slice of a circle, similar to a pizza or a pie.
Polar
Polar is a bit more complicated. If you take a Hinge and sweep it across Yaw by some amount, you get a segment of a sphere in Polar coordinates. You can configure Max Pitch and Max Yaw to adjust the size of the segment, and use Rotation to define where that segment is located on the sphere. The visualization for Polar is especially helpful.
Don't overuse Polar limits, as they have a non-zero performance cost. Using a huge amount (handwaving: more than 64) will probably cause some issues. If your Max Pitch and Max Yaw values are similar or the same, an Angle limit will suffice and costs less performance-wise.
Collision
Radius - Collision radius around each bone in meters. Used for both collision and grabbing.
Allow Collision - Allows collision with colliders other than the ones specified on this component. Currently the only other colliders are each player's hands and fingers as defined by their avatar.
Colliders - List of colliders that specifically collide with these bones.
Stretch & Squish
Stretch Motion - The amount motion will affect the stretch/squish of the bones. A value of zero means bones will only stretch/squish as a result of grabbing or collisions.
Max Stretch - Maximum amount the bones can stretch. This value is a multiple of the original bone length. Note: Maximum Bounds
Max Squish - Maximum amount the bones can shrink. This value is a multiple of the original bone length.
Grab & Pose
Allow Grabbing - Allows players to grab the bones.
Allow Posing - Allows players to pose the bones after grabbing.
Grab Movement - Controls how grabbed bones move. A value of zero results in bones using pull & spring to reach the grabbed position. A value of one results in bones immediately moving to the grabbed position.
Snap To Hand - When a bone is grabbed it will snap to the bone grabbing it.
Options
Parameter - Prefix used to provide multiple parameters to the avatar controller. In the following items, setting Parameter to Tail would replace {parameter} with Tail
{parameter}_IsGrabbed
[Bool] Whether the bones currently being grabbed
{parameter}_IsPosed
[Bool] Whether the bones been posed after being grabbed
{parameter}_Angle
[Float] Range of 0.0-1.0. Normalized 180 angle made between the end bone's is from its original rest position. In other words, if you twist a bone completely opposite of its start direction, this param will have a value of 1.0.
{parameter}_Stretch
[Float] Range of 0.0-1.0. How close the bones are to their maximum stretch length.
{parameter}_Squish
[Float] Range of 0.0-1.0. How close the bones are to their maximum squish length.
Is Animated - Allows bone transforms to be animated. Each frame bone rest position will be updated according to what was animated. This must be enabled in order for any bone in the PhysBone chain (Root bone included!) to respect animations applied to it.
Reset When Disabled - When this component becomes disabled, the bones will automatically reset to their default position.
Important Notes, Usage Tips, etc
Do not have a Constraint and a PhysBone component affecting the same game object, as this causes execution order issues.
Apply the Constraint to the parent game object instead. You can still have the source transform of the Constraint set to the original game object.
PhysBones have a hard limit on the Meta Quest. This is done to prevent a reduction in performance on the Meta Quest devices, which are often already low on CPU resources.
You can view those limits as the Very Poor limits for Quest described in the Minimum Displayed Performance Rank documentation.
Per-Component Limitations
A single PhysBone component cannot affect more than 256 transforms at a time. This counts the root bone as well as all children. This also affects Dynamic Bone conversions!
However, you should aim not to have that many transforms to animate in the first place. Try merging bones in the chain upward to their immediate parents. Community-created tools like Cat's Blender Plugin can do this for you.
Animating Properties
PhysBone properties like Spring, Pull, Stiffness, etc are set at initialization and cannot be animated.
However, if you animate a property of a PhysBone component and then animate the component off and then on, you may get the behavior you want. Be aware that this is not a supported method of animating these properties, and will not be supported in future changes. (In other words, it might break. If it does, we're not going to try to fix it.)
Humanoid Bones
Do not set Humanoid bones as PhysBone Root bones. In other words, do not set Hip, Spine, Chest, Upper Chest, Neck, Head, or any of the limb bones as Roots. This will cause major issues.
Instead, duplicate the bone you want to use as root and re-parent all the children bones you want to animate to that new duplicate root. This should be done in Blender. Community-created tools like Cat's Blender Plugin can do this for you.
PhysBone Rotation
Unlike Dynamic Bones, the root bone of a PhysBone chain is permitted to rotate. It can't translate, though. This can have some consequences with certain setups-- try things out on your own to see how it behaves.
PhysBone AV3 Parameters
When affecting parameters, there is no need to use Synced Parameters as defined by the VRCExpressionParameters object. These parameters are already updated on both the local and remote machines, as both will be running PhysBones.
PhysBone Immobile Behavior
Dynamic Bones bases its Inert value from where the component is placed, not the root transform. This is probably a Dynamic Bones bug. As such, PhysBones bases its Immobile value from the root transform. This may affect behavior in some cases.
Optimal Component Usage
Because of the multi-threaded nature of PhysBones, it isn't always the most efficient to put all bones into a single chain. Multiple components allows us to break up the work across threads. However, you should still strive to have fewer components... but it's not as bad to have a few on your avatar as it was with Dynamic Bones.
If you really need a number, you should consider splitting sets of chains when you're getting over 128 transforms affected by a single component. If you have a dress with 256 bones and it splits at a root, splitting it into two or three components will work.
However, if you're just dealing with something on the order of 32 bones... don't worry about it. As you can probably tell, these aren't strict rules! We'll likely introduce some soft warnings later on when something looks like it should be set up a different way.
Maximum Bounds
Each VRCPhysBone component has a bounding box that grows and shrinks as bones move around. These bounding boxes aid the collision detection for players touching and grabbing PhysBones. For efficiency, bounding boxes are forced to a maximum of 10×10×10 meters. PhysBones can go outside of this range and continue to work as expected. However, players may be unable to touch or grab those bones depending on their location.
The bounding box only accounts for bones with collision and a radius greater than zero. In situations where you want to provide extremely long stretching, as long as bones with collision exist past the stretching point, you can avoid hitting this maximum bounds limit.
VRCPhysBoneCollider
Defines a collider that will affect PhysBones that are configured correctly.

Root Transform - Transform where this collider is placed. If empty, we use this game object's transform.
Shape Type - Type of collision shape used by this collider. You can choose between a Sphere, Capsule, or Plane collider.
Radius - Size of the collider extending from its origin.
Height - Height of the capsule along the Y axis.
Position - Position offset from the root transform.
Rotation - Rotation offset from the root transform.
Inside Bounds - When enabled, this collider will contain bones within its bounds instead of keeping them out.
Bones As Sphere - When enabled, this collider will treat PhysBone collision radii as spheres centered on the bone's position rather than capsules running the length of the bone.
Standard Colliders
A set of "Standard Colliders" are defined in the Avatar Descriptor, in a new section called “Colliders”. This section lets you define a number of standard colliders that exist on every avatar. These will be setup automatically if you don’t touch this, but they may also be tweaked to exactly fit your avatar. These colliders do not affect the performance rating.
- Head
- Torso
- Hands L/R
- Feet L/R
- Fingers L/R
- Index
- Middle
- Ring
- Little
These colliders act primarily as Contact Senders that other people can detect with their avatars. However, the finger and hand colliders are also used to create global PhysBone Colliders that can be used to affect other people’s PhysBones.
Automatic Dynamic Bone Conversion
By default, the client will automatically convert Dynamic Bones over to PhysBones. This is done to increase overall performance and is also necessary for interactions between avatars. If desired, you can toggle this off in the Performance Options section of the Main Menu, but you will lose the performance gains and the ability for others to interact with you.
By default, Dynamic Bone conversions use Advanced mode, as we're able to more precisely match DB behavior with the Advanced integration method. Additionally, DB conversions use Ignore for the Multi-Child type. This may cause issues with some edge-case DB setups, but using First or Average causes unwanted behavior in almost all cases during conversion.
Turning off the conversion means you will not have any interaction with avatar bones that are driven by Dynamic Bones. However, avatars using PhysBones and Contacts natively will not be affected.
It is important to note that Dynamic Bones and PhysBones are not identical. The in-program conversion process is not perfect, and we intend to update it more over time. However, keep in mind: the conversion process will never be perfect! The goal of the automatic conversion is to have most setups working decently well and not breaking, not to perfectly replicate behavior. It is expected that all users will gradually transition to using PhysBones provided they want their avatars to be rendered accurately and future proof.
Manual Dynamic Bone Conversion
You can choose to use the SDK to convert your avatar from Dynamic Bones to PhysBones.
This process deletes the previous Dynamic Bone components from your avatar and can not be easily reversed. As a result, make a backup of your avatar before attempting this conversion.
You can access this tool in the SDK by looking at the Build Control Panel, or by accessing it in the Unity menu under VRChat SDK/Utilities/Convert DynamicBones to PhysBones. You must select the avatar beforehand for this to work.
Unmigrated Dynamic Bone Components
Some features and behaviors in Dynamic Bones do not exist in PhysBones, and will not migrate.
Force - Dynamic Bone Gravity and Force values in the X or Z directions are ignored as they have no equivalent in PhysBones.
Eventual Dynamic Bone Deprecation
Dynamic Bones will eventually be completely removed from VRChat. At that time, all older avatars still using Dynamic Bones will use the automatic conversion.
At a later time, we will give a deprecation date with plenty of time to allow for avatar authors to convert what they want to convert