Image Loading Example
Udon can load images from the internet and display them as UI elements or as textures on world objects. Our example world below demonstrates how the system works and how to use GitHub to host the images and captions.
Example World
Download the example project or visit the GitHub repo to clone it for yourself.
This scene has a picture frame that automatically changes to show different images with matching captions. The images and captions are both hosted for free on GitHub Pages and are included in the GitHub repository above.
Scene File: Assets/_Project/Gallery
Using the Prefab in Your World
To use the prefab, you'll need to add it to your project and set up the image caption URLs.
This repo publishes to GitHub Pages for free hosting. You can host the images and captions anywhere you want, but we recommend using GitHub Pages because it's free, easy to set up, and you can keep the images and captions in the same repository as your world. If you're hosting them elsewhere, skip to step 4.
-
Fork the example repo to your own GitHub account.
-
Edit the images and captions in the "Web" directory. You can ignore or delete the
index.htmlpage, it's just there as an example to test the images and captions in a browser. You can keep the images named 1.jpg, etc to make it easier to use the prefab, or rename them and update the prefab URLs.
When the files in the "Web" directory are edited, the website is re-published. As long as the filenames stay the same (images are 1.jpg, 2.jpg, etc.), the URLs in the world will point to the newly published files. Republishing happens automatically through an included GitHub Action.
-
Clone the repo to your computer.
-
Make sure your project has SDK 3.2.3 or newer as well as ClientSim and UdonSharp, which you can easily add through the Creator Companion.
-
Import the Prefab Unitypackage into your project.
-
Drag the SlideshowFrame prefab into your scene.
-
Select the SlideshowFrame in your scene's Inspector.
-
In the SlideshowFrame component, set the Image Urls array size to match the number of images you want to load, then update the URLs to match your image URLs. If you're using GitHub Pages, the URLs will be in the format
https://<your-github-username>.github.io/<your-repo-name>/1.jpg. -
Update the String Url to match your caption URL. If you're using GitHub Pages, the URL will be in the format
https://<your-github-username>.github.io/<your-repo-name>/captions.csv.
Testing it Out
If you're using GitHub to host the images and captions, make sure you've committed and pushed your changes to GitHub, which will trigger the GitHub Action to publish the files to GitHub Pages.
- Enter Play Mode in Unity.
- The images and captions should load automatically. If they don't, check the Console for errors.
- Run a Build and Test to make sure it works in VRChat as well. You may need to turn on "Untrusted URLs" in your settings.
Important GameObjects
The most important objects to inspect in the scene are TheFrame and SlideshowFrame.

TheFrame
TheFrame is a GameObject with a couple of important pieces:
- SlideshowFrame: an
UdonBehaviourwhich loads the images and captions from the web server. - Mesh: Is the black frame around the picture.
- Picture: Is a
Meshwhich renders the downloaded textures. - UI: Is a World-Space
Canvaswhich renders the captions.
SlideshowFrame
The SlideshowFrame UdonBehaviour has all of the logic to download the images and captions from the web server.

It has these public variables:
- Image Urls: An
Arrayof all theVRCUrlsfor the images to download. - String Url: Is a single
VRCUrlwhere the caption text can be downloaded. - Renderer: This target
Renderer'ssharedMaterial will have its texture set from the downloaded textures. - Field: This
UI Element'stext property will be set from the downloaded caption for the matching texture. - Slide Duration Seconds: How long to show each image.
The basic logic flow of the script is this:
Creating an Image Downloader
Using the ImageDownload script to download an image
The SDK includes a script to easily download images:
- Create a new GameObject in your scene.
- Add an UdonBehaviour component.
- Select
ImageDownloadas the program source. - Select a Material to apply the downloaded texture to
- (Optional) Customize
TextureInfoto change the downloaded texture's settings.
Create your own script for VRCImageDownloader
You can use VRCImageDownloader in your own Udon Graph scripts.
- Create a new
VRCImageDownloaderobject with its Constructor node. - Save the newly created
VRCImageDownloaderas a variable. (This required.) - Execute the
DownloadImagefunction on theVRCImageDownloaderinstance. - (Optional) Wait for the
OnImageLoadSuccessorOnImageLoadErrorevent to execute.
The basic logic flow of the script is:
- On Start, construct a
VRCImageDownloaderto reuse for downloading all the images. It's important to keep this around so the textures will persist.
// It's important to store the VRCImageDownloader as a variable, to stop it from being garbage collected!
_imageDownloader = new VRCImageDownloader();
- Download the captions/strings from the
String Url.
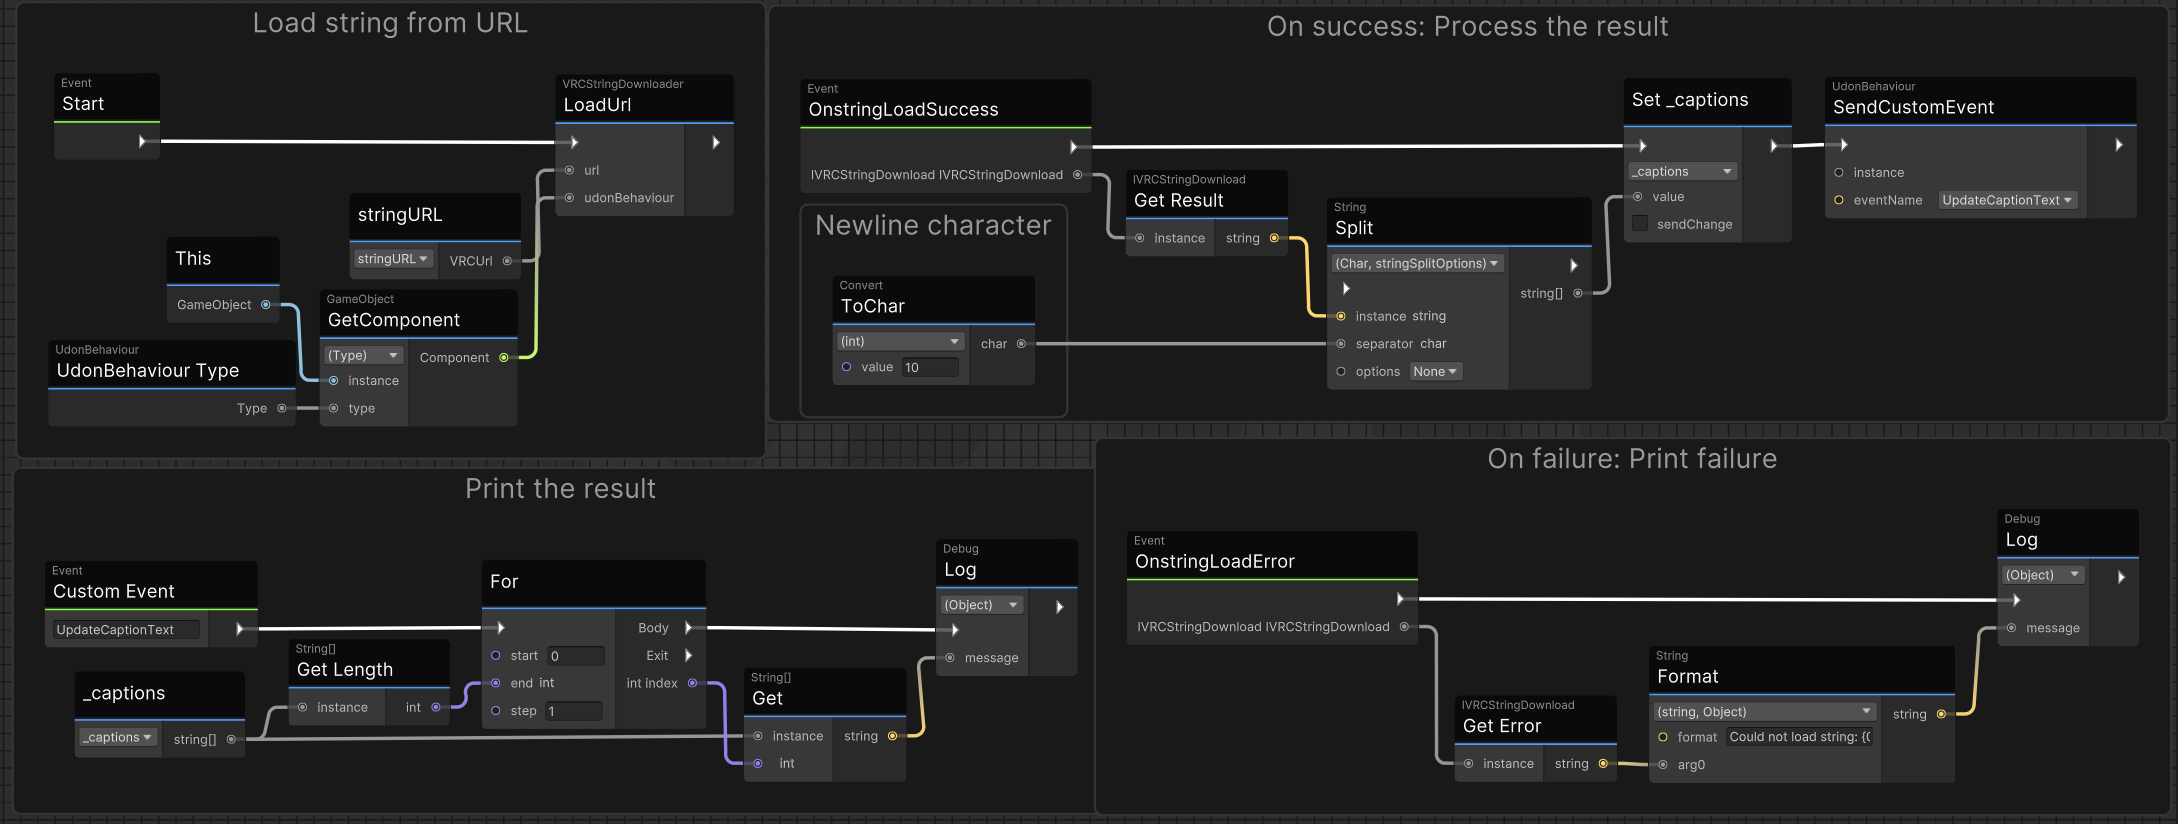
If the String downloads successfully, split it up line-by-line into separate strings, and save those to a _captions array. If it doesn't download, log the error message.
- Udon Graph
- UdonSharp
private void Start()
{
    // To receive Image and String loading events, 'this' is casted to the type needed
    _udonEventReceiver = (IUdonEventReceiver)this;

    // Captions are downloaded once. On success, OnImageLoadSuccess() will be called.
    VRCStringDownloader.LoadUrl(stringUrl, _udonEventReceiver);
}

public override void OnStringLoadSuccess(IVRCStringDownload result)
{
    _captions = result.Result.Split('\n');
    UpdateCaptionText();
}

public override void OnStringLoadError(IVRCStringDownload result)
{
    Debug.LogError($"Could not load string {result.Error}");
}
- Try to Load the next Image. Increment the
_loadedIndexto keep track of our place, then callDownloadImage()on the downloader we saved earlier.
If the Image downloads successfully, save a reference to it and then load it up on the Renderer. If it fails, log the error message.
- Call the function to Load the next Image again, delayed by
SlideDurationSeconds. The_loadedIndexis incremented during each Load call, and starts over after reaching the last url in the array.
When each image is visited for the second+ time, it will be displayed from its saved Texture2D reference instead of loaded fresh, unless it failed to download the first time.
View the full source code for SlideshowFrame.cs on GitHub.
Known Issues
- The first image doesn't have its caption loaded quickly enough, so it doesn't show until the first loop around.
View the main Image Loading docs page for full details on the Image Loading system, including domain and file limits.